| |
Creating Hyperlinks in MS Word |
|
| |
|
|
| |
This document demonstrates the steps involved in creating hyperlinks in
MS Word documents.
This process
may be very helpful during the creation of lesson plans. |
|
| |
|
|
| |
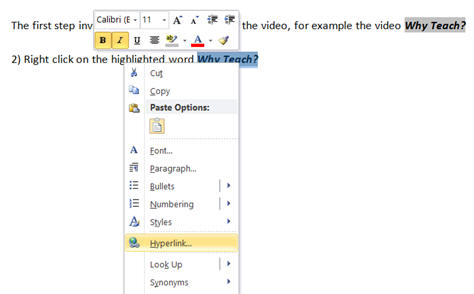
The first step involves 1)
highlight the name of a video, for example the video
Why Teach?
|
|
| |
|
|
| |
2)
Right click on the highlighted word
Why Teach?
Scroll down and Left Click on “Hyperlink…” (see below)
|
|
| |
 |
|
| |
|
|
| |
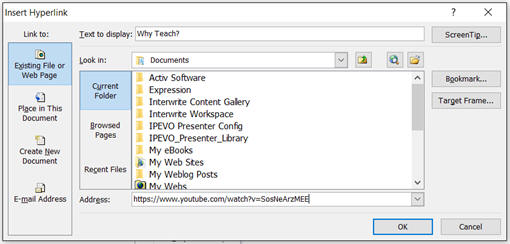
3)
In the “Address:” window, copy and paste or type in the URL (or
location of the video either in the computer or external drive) of the
video that you wish to hyperlink to (see below). |
|
| |
 |
|
| |
|
|
| |
Here is an example of the
link-
Why Teach?
Please note that this link requires a connection to the
Internet for access. To
access the video, hold down the “Ctrl” button and click on the link
Why Teach?.
|
|
| |
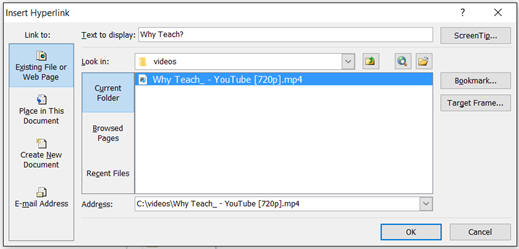
You may also link to a video that you have downloaded to your computer
or external drive.
To accomplish
this, you should first download a video to your computer or external
drive.
It is also important to
download the video into a location on your computer or external drive
that will not change.
If you
change the location of the video, you will need to change the links on
the Word document to match the new location.
For classroom use, this is the best and most reliable method to
use. |
|
| |
 |
|
| |
|
|
| |
It is also important to consider the format in which you download the
videos. The classroom computer
that you use may only support MS Real Player.
Because of this, you should download and save the videos in the
“MP4
Format"
format. In addition, it is
suggested to create sub directories to save your videos and documents on
an external drive. When creating
documents, be sure to use the external drive that contains the videos
and documents. |
|
| |
|
|
| |
|
|
| |
|
|
| |
|
|
| |
|
|
| |
|
|